Local Businesses Blog in Texas

Cleveland Texas

Tag: Garage Door Repair Oklahoma City OK

How To Open Garage Door Manually From Outside – CCM Overhead Doors

Being locked out of your Garage Door Repair Oklahoma City OK can be a frustrating experience. However, knowing how to manually open a garage door from outside can provide a solution to this problem and allow you to access your garage in emergency situations or during power outages.

In this guide, we’ll walk you through the step-by-step process of opening a garage door manually from outside, ensuring that you can regain access to your garage quickly and easily.

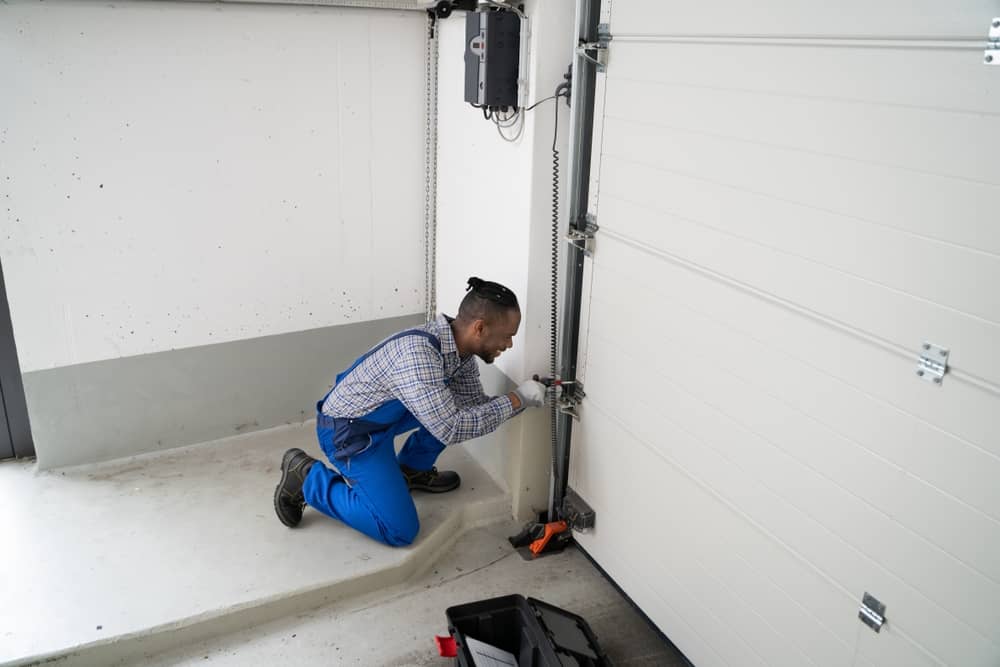
1. Locate the Emergency Release Kit

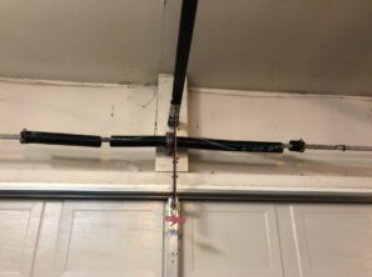
Most garage doors are equipped with an emergency release kit that allows you to disengage the door from the opener and manually operate it in the event of a power outage or malfunction. The emergency release kit typically consists of a release cord and handle, which are located near the top of the door, close to the center.

2. Identify the Emergency Release Cord

To manually open the garage door from outside, locate the emergency release cord and handle. The cord is usually red and hangs down from the track near the center of the garage door. It may be tucked away or obscured by other components, so take your time to locate it.

3. Pull the Emergency Release Cord

Once you’ve located the emergency release cord, pull it down firmly in the direction of the garage door. This action will disengage the door from the opener carriage, allowing you to manually lift the door without resistance from the motor.

4. Lift the Garage Door

With the emergency release cord pulled down, proceed to lift the garage door manually. Place your hands on the bottom edge of the door and lift it carefully, using your legs and back to support the weight. Be mindful of the door’s weight, especially if it’s a larger or heavier door.

5. Secure the Door in the Open Position

After manually opening the garage door, it’s essential to secure it in the fully open position to prevent it from closing unexpectedly. Use locking mechanisms or clamps to hold the door in place, ensuring safety and peace of mind until it’s time to close the door.

6. Exercise Caution

While manually operating the garage door from outside, it’s crucial to exercise caution and follow proper safety procedures. Avoid placing your fingers or hands near moving parts, such as hinges and rollers, to prevent injury. Additionally, be mindful of the door’s weight and take necessary precautions to avoid strain or accidents.

7. Perform Regular Maintenance

To ensure continued reliability and smooth operation of your garage door, perform regular maintenance and inspections. Keep the tracks clean and free of debris, lubricate moving parts as needed, and check the condition of springs, cables, and rollers regularly.

8. Consider Installing Backup Power

To prevent future inconvenience during power outages, consider installing a backup power source for your garage door opener. Backup power options, such as battery backup systems or generators, can provide peace of mind and ensure uninterrupted access to your garage, even when the power is out.

9. Seek Professional Assistance if Needed

If you encounter difficulties or safety concerns while manually opening your garage door from outside, or if you’re unsure about performing maintenance tasks, don’t hesitate to seek professional assistance. Contact a reputable garage door technician to inspect and repair any issues with your garage door system, ensuring safe and reliable operation in the future.

By following these steps and exercising proper caution, you can successfully open your garage door manually from outside and regain access to your garage when needed. Whether you’re facing a power outage, malfunctioning opener, or simply need to perform maintenance on your garage door system, knowing how to operate it manually provides invaluable peace of mind and convenience.

CCM Overhead Doors

1000 NW 80th St, Oklahoma City, OK 73114, United States

1-405-563-8982

How To Hang Vinyl Banner On Garage Door – CCM Overhead Doors


Garage Door Repair Oklahoma City OK Whether you’re celebrating a birthday, announcing a sale, or promoting your brand, hanging a vinyl banner on your garage door can be a straightforward process with the right tools and techniques.

Here’s a detailed guide on how to hang a vinyl banner on a garage door:

1. Measure the Garage Door: Before you begin, measure the width and height of your garage door to determine the size of the banner you’ll need. Use a tape measure to measure the width of the door opening and the height from the top of the door to the ground.

2. Choose the Right Size Banner: Select a vinyl banner that is slightly smaller than the dimensions of your garage door to ensure a proper fit. Consider the content and design of the banner, as well as any hardware or accessories you’ll need to hang it securely.

3. Gather Materials and Tools: Once you’ve chosen the banner size, gather the necessary materials and tools for hanging it on your garage door. You’ll need the vinyl banner, grommets or eyelets, zip ties or rope, a ladder or step stool, and a drill or hammer.

4. Prepare the Garage Door: Clean the surface of the garage door where you plan to hang the banner to remove any dirt, dust, or debris. Use a mild detergent and water solution to clean the surface, and allow it to dry completely before proceeding.

5. Position the Banner: Position the vinyl banner on the garage door, aligning it horizontally and vertically to ensure it’s centered and level. Use a tape measure and level to guide you, and adjust the position of the banner as needed.

6. Attach Grommets or Eyelets: Once the banner is in position, mark the locations where you’ll attach the grommets or eyelets along the top edge of the banner. Space the grommets evenly, approximately 12-24 inches apart, depending on the size of the banner.

7. Install Grommets or Eyelets: Use a grommet kit or eyelet punch tool to install the grommets or eyelets in the marked locations along the top edge of the banner. Follow the manufacturer’s instructions for proper installation, ensuring that the grommets are securely attached to the banner.

8. Secure the Banner to the Garage Door: With the grommets or eyelets in place, use zip ties or rope to secure the banner to the garage door. Thread the zip ties or rope through the grommets and around the horizontal rails or vertical panels of the garage door, pulling them tight to hold the banner securely in place.

9. Trim Excess Zip Ties or Rope: Once the banner is securely attached to the garage door, trim any excess zip ties or rope with scissors or wire cutters to create a neat and tidy appearance. Be careful not to cut the banner or leave any sharp edges that could cause injury.

10. Check for Stability: After hanging the banner, check for stability and ensure that it is securely attached to the garage door. Gently tug on the corners and edges of the banner to make sure it’s not loose or sagging, and adjust the zip ties or rope as needed to tighten the banner.

11. Test the Door Operation: Before leaving the banner in place, test the operation of the garage door to ensure that it opens and closes smoothly without interference from the banner. If the banner obstructs the movement of the door, adjust its position or remove it temporarily while operating the door.

12. Monitor and Maintain: Regularly inspect the vinyl banner and its attachments to ensure that it remains secure and in good condition. Check for signs of wear, damage, or fading, and make any necessary repairs or replacements to keep the banner looking its best.

Garage Door Repair Oklahoma City OK By following these steps and taking the necessary precautions, you can hang a vinyl banner securely and safely on your garage door, creating a custom look that’s sure to grab attention.

CCM Overhead Doors

1000 NW 80th St, Oklahoma City, OK 73114, United States

1-405-563-8982

Have To Hold Button Down For Garage Door To Close – CCM Overhead Doors

If you find yourself having to hold down the Garage Door Repair Oklahoma City OK to close, it can be inconvenient and potentially indicative of underlying issues with your garage door opener or safety sensors.

In this comprehensive guide, we’ll explore common reasons why you may need to hold the button down and provide solutions to address this issue.

  1. Check Safety Sensors:
    • One of the most common reasons why you need to hold the button down is a misaligned or malfunctioning safety sensor. Safety sensors are designed to detect objects or obstructions in the path of the closing garage door and prevent it from closing to avoid accidents.
    • Inspect the safety sensors located near the bottom of the garage door tracks on both sides. Ensure that the sensors are aligned properly and that there are no obstructions blocking the sensor beams.
    • Clean the sensor lenses with a soft, dry cloth to remove any dirt or debris that could interfere with the sensor’s operation. If the sensors are misaligned, adjust them carefully until the indicator lights on both sensors are lit and steady.
  2. Check for Obstructions:
    • Another common reason for having to hold the button down is the presence of obstructions in the path of the garage door. Even small objects or debris can trigger the safety sensors and prevent the door from closing automatically.
    • Inspect the area around the garage door and remove any objects, such as toys, tools, or debris, that could be blocking the door’s path. Pay particular attention to the area near the bottom of the door where obstructions are most likely to occur.
  3. Inspect Garage Door Tracks and Rollers:
    • Misaligned or damaged garage door tracks and rollers can also prevent the door from closing properly and require you to hold the button down. Inspect the tracks for any signs of bends, dents, or obstructions.
    • Use a level to check the alignment of the tracks and adjust them as needed to ensure they are straight and parallel. Tighten any loose bolts or screws that may be causing the tracks to shift or move out of alignment.
    • Lubricate the rollers and tracks with a silicone-based lubricant to ensure smooth operation and reduce friction that could impede the door’s movement.
  4. Test the Door Balance:
    • An unbalanced garage door can place excessive strain on the opener and cause it to operate improperly, requiring you to hold the button down. Test the balance of the door by disconnecting the opener from the door and manually lifting it halfway.
    • The door should stay in place when released and not move up or down on its own. If the door moves, it may be unbalanced, indicating a problem with the springs or cables that require adjustment or replacement by a professional technician.
  5. Check Opener Settings:
    • Some garage door openers have adjustable settings that control the door’s closing force and sensitivity. If the settings are too low, the opener may not detect resistance from the door and require you to hold the button down.
    • Consult your opener’s user manual for instructions on adjusting the closing force and sensitivity settings. Increase the settings gradually until the door closes properly without requiring you to hold the button down.
  6. Inspect Opener Limit Switches:
    • The opener’s limit switches determine how far the door opens and closes. If the limit switches are improperly set or malfunctioning, the door may not close all the way and require you to hold the button down.
    • Refer to your opener’s user manual for instructions on adjusting the limit switches. Follow the manufacturer’s recommended procedures to ensure the switches are set correctly for smooth and reliable operation.
  7. Test Remote Control Batteries:
    • If you’re using a remote control to operate the garage door, low or dead batteries can cause intermittent operation and require you to hold the button down. Replace the batteries in the remote control with fresh ones and test the door’s operation.
  8. Perform a Safety Reversal Test:
    • All garage door openers are equipped with safety reversal mechanisms that automatically reverse the door if it encounters an obstruction while closing. Perform a safety reversal test to ensure the mechanism is functioning properly.
    • Place a sturdy object, such as a block of wood, in the path of the closing garage door. Activate the door to close using the opener or remote control.
    • The door should reverse immediately upon contacting the object. If the door does not reverse or if it reverses with excessive force, there may be a problem with the safety reversal mechanism that requires inspection and repair by a professional technician.

By addressing these common issues and following the recommended solutions, you can resolve the need to hold down the button for your Garage Door Repair Oklahoma City OK. Regular maintenance and periodic inspections of your garage door and opener can help prevent issues and ensure safe and reliable operation. If you’re unable to diagnose or resolve the problem on your own, consider consulting a professional garage door technician for assistance.

CCM Overhead Doors

1000 NW 80th St, Oklahoma City, OK 73114, United States

1-405-563-8982

Why is it Important To Replace a Garage Door Gasket?

Garage Door Oklahoma City OK

Replacing Garage Door Gasket

Garage doors need to have seals in order to protect them from the rain, and wind, as well as rodents, snakes, and bugs. Most garage door owners have seen the seal they have and found it dry-rotted or worn from years of use. You will need to replace the door every once in a while as it is a moving door. It can be damaged by direct contact with dirt, rubbing it on the ground, and slipping on the floor when it closes. The sun, cold and physical tears in the seal could also cause it to wear or rot. Need our Experts at Garage Door Oklahoma City OK visit us today.

It’s easy to do and very affordable. This tutorial will focus on modern door seals. They have been around for over 10 years. The seals are mounted on an inclined track with a double channel at the bottom of the door. Some doors only have one channel for sealing, but it will still work. Older doors may need to be attached to the back of the door’s lip with a Hammer, screws, or nails. Modern doors often use this channel system.

These are the steps to replace your garage door seal.

Step 1 – Gathering your Materials and Tools

This job requires only a few tools.

* Measure your door with tape or another method.

To match the door, use shears to cut the door seal.

You will place the material in the lower portion of your door. You should start collecting the materials first so you don’t have to go looking for them.

Step 2 – Measure everything and get your seal ready

This image will show you the possible prices for your door seal.

Door length: Measure your door with a tape measurer.

Door Thickness: Measure the thickness of the door from the bottom. They typically measure 1 to 2 inches in width.

Channel Width. To determine the size of the seal lip, you will need to measure the interior dimensions of the channel. The channel should be approximately 5/16 inches, 3/8 inches, and 1/4 inches in size. This indicates how wide the seals will fit within the channel.

Step 3 – Step Three – Compare Your New Seal with Your Old

After you have your seal, place it on a flat surface. Next, take out the old seal. Place the seal on top of your new seal.

Step 4 – Review the Mounting Method for Channels

To ensure that the seal can be moved down the channels, both ends of the flat seal must be folded inwards. Some doors have only one channel, so you will need a seal with a “T-” edge channel. Most doors have two channels. My door’s edge shows the channels and an illustration of how to mount the seal to fit it.

Step 5 – Pull the Seal in the Channels Down the Door Length

Once your channels are clean, you can start putting in the seal. It is easy and quick. It is important to pay attention and not take shortcuts.

  • Start at the opposite edge of the doors, and insert the seal in the channels. Then fold it into its “C”, if necessary.
  • Once it’s started, push the seal to the desired width. Once it’s in place, fold it over to the channel on the opposite side of your door.
  • Continue to fill the channel until it is full.

Step 6 – Trim and Secure Your New Seal To Fit Your Door

After you have put the seal back in place, you can inspect the length of your door to confirm that everything is within the channels. To confirm that the seal is at the top, check the door.

You should have enough length to seal the hole. To stop the seal from leaking through the channels’ sides, apply a little rubber cement to the ends of the seal.

Step 7 – Inspect your work and finalize it

Use your scissors to reduce the seal by about 1/2 inch. This will allow the seal to move freely without leaking.

Now you can open your door to inspect it for aps or fitment. At this stage, air and water should not be allowed to enter the security barrier. You may need to modify the gap in your opener if your door has gaps.

I hope this gives you the confidence to tackle this task. This was a simple task, and parts are easily found and inexpensive.

Powered by WordPress & Theme by Anders Norén