Local Businesses Blog in Texas

Cleveland Texas

Tag: garage door repair service

How To Program Second Chamberlain Garage Door Opener – Southern Home Creations Garage Doors & Openers

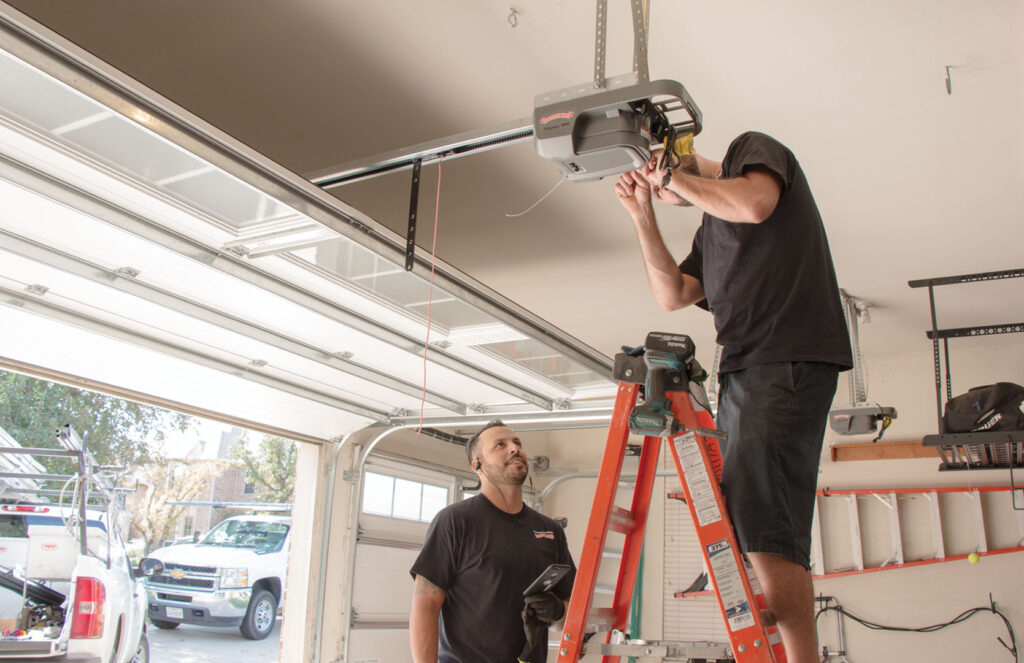
Programming a second Chamberlain Garage Door Repair Suwanee GA involves a series of steps to synchronize the opener with your garage door and remote control devices.

Here’s a detailed guide on how to program a second Chamberlain garage door opener:

1. Locate the Learn Button:

  • Before programming your second Chamberlain garage door opener, locate the “Learn” button on the opener motor unit. This button is typically located on the back or side of the motor unit and may be labeled as “Learn” or “Program.”

2. Clear Existing Codes (Optional):

  • If you’re reprogramming the garage door opener or adding a new remote control, it’s recommended to clear existing codes from the opener memory. Press and hold the “Learn” button on the motor unit until the indicator light turns off, indicating that existing codes have been erased.

3. Program Remote Controls:

  • To program a remote control device to the Chamberlain garage door opener, follow these steps:
    • Press and release the “Learn” button on the motor unit. The indicator light will illuminate, indicating that the opener is in programming mode.
    • Within 30 seconds, press and hold the button on the remote control that you wish to program. Hold the button until the indicator light on the motor unit flashes, indicating that the remote control has been successfully programmed.
    • Repeat this process for each additional remote control device you wish to program to the garage door opener.

4. Program Keyless Entry Keypad (If Applicable):

  • If your Chamberlain garage door opener is equipped with a keyless entry keypad, you can program it using similar steps:
    • Press and release the “Learn” button on the motor unit.
    • Within 30 seconds, enter your desired PIN code on the keypad and press the “Enter” or “Learn” button. The indicator light on the motor unit should flash, indicating that the keypad has been successfully programmed.

5. Test the Remote Controls and Keypad:

  • After programming remote controls and keypads, test their functionality to ensure they operate the garage door opener correctly. Stand inside your garage and press the programmed buttons on the remote controls or enter the PIN code on the keypad to open and close the garage door.

6. Adjust Travel Limits and Force Settings (If Necessary):

  • After programming the remote controls and keypad, it’s a good idea to test the garage door’s travel limits and force settings to ensure smooth and safe operation. Refer to the opener’s user manual for instructions on adjusting travel limits and force settings as needed.

7. Finalize Programming:

  • Once you’ve programmed all remote controls and keypad devices and verified their functionality, press the “Learn” button on the motor unit to exit programming mode. The indicator light should turn off, indicating that the programming process is complete.

8. Troubleshooting:

  • If you encounter any issues during the programming process, such as the indicator light not flashing or remote controls not working, double-check the programming steps and ensure that you’re within range of the opener. If problems persist, refer to the opener’s user manual for troubleshooting tips or contact customer support for assistance.

Conclusion:

  • By following the steps outlined above and referring to the opener’s user manual for guidance, you can program your second Chamberlain Garage Door Repair Suwanee GA with ease and enjoy convenient access to your garage.

Southern Home Creations Garage Doors & Openers

4110 Tench Rd Suite D, Suwanee, GA 30024, United States

1-770-831-0301

https://maps.app.goo.gl/1sSeEcj3whKsA8wN7

How To Repair Peeling Paint On Garage Door – 20527 Farm to Market 1093 a2


Peeling paint not only detracts from the aesthetic appeal of the  Garage Door Repair Richmond TX but also exposes the underlying surface to moisture, UV radiation, and other environmental elements, leading to deterioration and damage over time.

Here’s a comprehensive guide on how to repair peeling paint on a garage door:

  1. Assess the Damage: Start by inspecting the garage door to assess the extent of the peeling paint and identify any underlying issues that may be contributing to the problem. Look for areas where the paint is flaking, bubbling, or peeling away from the surface of the door. Check for signs of moisture damage, rust, or corrosion on the door panels, hinges, hardware, and other components.
  2. Clean the Surface: Before repairing the peeling paint, thoroughly clean the surface of the garage door to remove dirt, debris, grease, and loose paint chips. Use a mild detergent or cleaner and a stiff-bristled brush or sponge to scrub the door surface, paying particular attention to areas with peeling paint. Rinse the door with clean water and allow it to dry completely before proceeding with repairs.
  3. Scrape and Sand: Use a paint scraper or putty knife to carefully remove any loose or peeling paint from the surface of the garage door. Scrape away the loose paint chips until you reach a solid, stable surface. Once the loose paint has been removed, use fine-grit sandpaper or a sanding block to smooth the edges and rough spots where the paint has peeled away. Sand the entire surface of the door to create a smooth, uniform substrate for repainting.
  4. Repair Surface Imperfections: If the garage door surface has any dents, dings, or scratches, fill them in with an appropriate filler or patching compound. Use a putty knife to apply the filler evenly over the damaged areas, smoothing it out to create a seamless surface. Allow the filler to dry completely according to the manufacturer’s instructions, then sand it smooth to blend with the surrounding surface.
  5. Prime the Surface: Before repainting the garage door, apply a high-quality primer to the entire surface to promote adhesion and seal the underlying substrate. Choose a primer specifically formulated for exterior metal or wood surfaces, depending on the material of your garage door. Apply the primer evenly with a paintbrush or roller, following the manufacturer’s instructions for drying times and coverage rates. Allow the primer to dry completely before proceeding with painting.
  6. Choose the Right Paint: Select a high-quality exterior paint suitable for the material of your garage door, such as metal or wood. Choose a paint color and finish that complements the aesthetic of your home and provides long-lasting protection against UV rays, moisture, and other environmental factors. Consider using a paint specifically formulated for use on garage doors or metal surfaces for optimal durability and performance.
  7. Apply the Paint: Once the primer has dried, apply the paint to the garage door using a paintbrush, roller, or sprayer, depending on your preference and the size of the door. Work in smooth, even strokes, overlapping each pass slightly to ensure uniform coverage. Apply multiple thin coats of paint rather than one thick coat to achieve a smooth, durable finish. Allow each coat to dry completely before applying the next coat, following the manufacturer’s recommended drying times.
  8. Protect and Maintain: After painting the garage door, allow the paint to cure fully according to the manufacturer’s instructions before exposing it to heavy use or inclement weather. Once the paint has cured, consider applying a clear topcoat or sealant to provide an additional layer of protection against UV rays, moisture, and abrasion. Regularly inspect the garage door for signs of peeling, cracking, or damage, and touch up any areas as needed to maintain its appearance and integrity.
  9. Prevent Future Damage: To prevent peeling paint and maintain the appearance and durability of your garage door, take proactive measures to protect it from environmental damage. Keep the door clean and free of dirt, debris, and moisture buildup by regularly washing it with soap and water. Trim back overhanging branches and vegetation to prevent contact with the door surface, which can cause abrasion and damage to the paint. Consider installing a canopy or awning over the garage door to provide additional protection from sun exposure and weathering.
  10. Seek Professional Help if Needed: If you encounter challenges or are unsure about repairing peeling paint on your garage door, consider seeking assistance from a professional painter or garage door technician. A qualified professional can assess the condition of the door, recommend appropriate repair solutions, and ensure that the repair work is completed safely and effectively. Additionally, professionals have access to specialized tools, materials, and expertise to achieve professional-quality results.

 Garage Door Repair Richmond TX If you encounter challenges or prefer to leave the repair work to professionals, don’t hesitate to seek assistance from qualified experts in painting or garage door repair.

20527 Farm to Market 1093 a2

713-248-2684

https://maps.app.goo.gl/t63qb9AmNfom8KU87

How to Reset Travel on Chamberlain Garage Door Opener-Brother’s Garage Door

To reset the travel on a Chamberlain Garage Door Repair opener, you can follow the steps outlined below.

It’s important to note that these instructions are general guidelines, and the specific steps may vary depending on the model of your Chamberlain garage door opener. Always refer to your product manual for accurate instructions.

  1. Prepare for the Reset:
    • Ensure that the garage door is fully closed.
    • Disconnect the power supply to the garage door opener by unplugging it from the electrical outlet or turning off the circuit breaker connected to the opener.
  2. Locate the Travel Adjustment Controls:
    • Look for the travel adjustment controls on your Chamberlain garage door opener. These are typically located on the side or rear panel of the opener unit.
    • The travel adjustment controls are usually labeled as “Up Limit,” “Down Limit,” or similar terms.
  3. Adjust the Up Limit:
    • Find the Up Limit adjustment control and turn it in the direction indicated for increasing the door’s up travel. This will typically be clockwise, but refer to your product manual for accurate instructions.
    • Turn the adjustment control in small increments, such as quarter-turns, and test the door after each adjustment.
    • To test the adjustment, reconnect the power supply to the opener and press the garage door opener remote or wall button to operate the door. Observe the door’s movement and check if it stops at the desired fully open position.
    • If the door does not stop at the desired position, repeat the adjustment process, making smaller increments until the door reaches the correct position.
  4. Adjust the Down Limit:
    • Locate the Down Limit adjustment control and turn it in the direction indicated for increasing the door’s down travel. This is typically counterclockwise, but consult your product manual for accurate instructions.
    • Again, make small adjustments and test the door after each adjustment to ensure it stops at the desired fully closed position.
    • Reconnect the power supply, activate the door, and observe its movement. If the door doesn’t close to the desired position, repeat the adjustment process in smaller increments until the door closes properly.
  5. Fine-Tuning:
    • Once you have adjusted the up and down travel limits, you may need to fine-tune the adjustments to ensure the door stops exactly where you want it to.
    • Some Chamberlain garage door openers have additional controls, such as the force and sensitivity settings, that can affect the door’s travel. Refer to your product manual to determine if these adjustments are necessary and how to perform them.
  6. Test and Finalize:
    • After making the necessary adjustments, test the garage door’s operation several times to ensure it opens and closes correctly.
    • If you encounter any issues or the door doesn’t function as desired, consult the troubleshooting section of your product manual or contact Chamberlain customer support for further assistance.

Remember, safety should be your top priority when working with Garage Door Repair openers. Always follow the manufacturer’s instructions, use caution, and be aware of potential hazards.

Brother’s Garage Door

29522 Wentworth St. Livonia, MI 48154

734-292-0971

How to Reprogram Garage Door Keypad-GC GARAGE DOORS CORP

Reprogramming a Garage Door Repair keypad is a straightforward process that allows you to change the entry code for added security and convenience.

Here’s a step-by-step guide to reprogram your garage door keypad:

  1. Identify the Type of Keypad: There are various types of garage door keypads available, so it’s important to determine the specific model you have. Consult the user manual or look for a model number on the keypad itself to ensure you have accurate instructions.
  2. Locate the “Learn” Button: Most modern garage door openers have a “Learn” button located on the motor unit. This button is usually near the antenna wire or under the light cover. Pressing this button puts the opener into programming mode.
  3. Clear Existing Codes: Before reprogramming the keypad, it’s essential to clear any existing codes from the garage door opener’s memory. Locate the “Learn” button and press and hold it for about 10 seconds until the indicator light on the motor unit blinks or a beep is heard. This indicates that the existing codes have been cleared.
  4. Enter Programming Mode: Press the “Learn” button again, and the indicator light should start blinking or a beep should sound, indicating that the garage door opener is ready to accept a new code.
  5. Enter New Code on Keypad: On the keypad, enter the new code you want to assign. Ensure that the code is easy for you to remember but difficult for others to guess. The keypad should have a dedicated “Enter” or “Send” button, press it after entering the new code.
  6. Test the Code: After entering the new code, press the “Enter” or “Send” button on the keypad to test if the code works. The garage door should open or close, depending on the button you press (e.g., “Open” or “Close”).
  7. Repeat for Additional Keypads: If you have multiple keypads, follow the same process for each one, ensuring that the new code is the same on all keypads.
  8. Finalize the Reprogramming: Once you have programmed all the keypads with the new code, press the “Learn” button on the motor unit one final time to exit the programming mode. The indicator light should stop blinking or a beep should be heard, indicating that the reprogramming process is complete.
  9. Test all KeyPads: To ensure that the reprogramming was successful, test all keypads by entering the new code and verifying that the garage door opens or closes accordingly.
  10. Keep the New Code Secure: Finally, remember to keep your new code secure and avoid sharing it with unauthorized individuals. Regularly update the code for added security.

By following these steps, you should be able to reprogram your Garage Door Repair keypad with a new entry code. Remember to consult your specific keypad’s user manual if you encounter any difficulties or if the process differs from the general instructions provided here.

GC GARAGE DOORS CORP

1333 S Schoolhouse Rd ste 300, New Lenox, IL 60451

1-779-204-8091

How to Open Garage Door Manually-Circle B Overhead Door

Garage Door Repair Services are convenient and offer easy access to your vehicles and storage space. However, there may be situations when you need to open your garage door manually, such as during a power outage or when the automatic opener malfunctions.

In this guide, we will walk you through the process of manually opening a garage door. Please note that these instructions are for a typical overhead garage door with a manual release mechanism. Always consult your specific garage door manufacturer’s instructions for accurate information.

  1. Prepare the area:
    • Ensure the garage door area is clear of any obstructions, such as vehicles, tools, or debris. This will prevent any accidents or damage during the manual opening process.
  2. Locate the manual release mechanism:
    • Look for a red cord or handle hanging from the garage door opener’s motor track or ceiling. This is the manual release mechanism. It is usually located near the center of the door, but the exact placement may vary depending on your garage door opener model.
  3. Pull the release cord/handle:
    • Firmly grip the handle or cord and pull it straight down towards the floor. This action disengages the garage door opener’s motor from the door itself, allowing you to operate it manually.
  4. Check the door’s balance:
    • Once the release mechanism is engaged, attempt to lift the garage door manually. Lift the door about halfway up and then let go. If the door stays in place, it is properly balanced. If it falls or rises on its own, it may be unbalanced and require professional adjustment. Avoid operating an unbalanced garage door manually.
  5. Lift the garage door:
    • Stand facing the garage door and place your hands on either side of the door, near the bottom. Bend your knees and use your leg muscles to lift the door while keeping your back straight. Lift the door smoothly and steadily until it is fully open.
  6. Secure the door:
    • Once the door is open, secure it in place using a locking mechanism, if available. Some garage doors have a lock bar that can be slid across the door’s track to prevent it from closing unintentionally. Consult your garage door manufacturer’s instructions to determine if your door has a locking feature.
  7. Closing the door:
    • To close the garage door, reverse the process. Remove any locking mechanisms, if used, and carefully lower the door by hand. Ensure that you have a firm grip on the door and lower it slowly to avoid any accidents. Once the door is closed, re-engage the automatic opener by pulling the release handle or cord towards the motor track until it clicks back into place.
  8. Test the automatic opener:
    • After closing the door manually, test the automatic opener to ensure it is functioning correctly. Press the button on your remote or wall-mounted control panel to operate the door automatically. If the opener is working properly, it should open and close the door smoothly.

Remember, manually opening a Garage Door Repair Services should only be done when necessary, and it’s always recommended to consult your garage door manufacturer’s instructions for specific guidance. Additionally, if you encounter any difficulties or your garage door doesn’t operate as expected, it’s best to contact a professional garage door technician for assistance.

Circle B Overhead Door

1818 Drillers Dr, Bryan, TX 77808, United States

1-979-324-6733

How to Gel Stain a Garage Door-Bluegrass Garage Door

Gel staining is a popular technique used to transform the appearance of wooden surfaces, including Garage Door Repair. This process involves applying a gel stain, which is thicker than traditional liquid stains, to achieve a more controlled and even color application.

In this guide, we will walk you through the step-by-step process of gel staining a garage door to give it a fresh and appealing look.

Materials Needed:

  1. Gel stain of your choice
  2. Paintbrush or foam brush
  3. Clean rags
  4. Sandpaper (120-grit and 220-grit)
  5. Painter’s tape
  6. Plastic sheeting or drop cloths
  7. Paint stir sticks
  8. Paint tray
  9. Paint thinner or mineral spirits (for clean-up)
  10. Safety goggles, gloves, and a respirator mask

Step 1: Preparation Start by preparing your garage door for the staining process. Ensure the door is clean and free from any dirt, dust, or grease. If necessary, use a mild detergent and water to clean the surface thoroughly. Allow the door to dry completely before proceeding.

Step 2: Sanding To achieve a smooth and even surface for the gel stain, lightly sand the entire garage door using 120-grit sandpaper. Sand in the direction of the wood grain, paying extra attention to any rough or uneven areas. Once done, switch to 220-grit sandpaper and repeat the process to create a smooth finish. Remove any dust generated during sanding using a clean cloth.

Step 3: Protect Surrounding Areas To prevent accidental staining, cover any adjacent surfaces, such as the walls and concrete, with plastic sheeting or drop cloths. Use painter’s tape to secure the covering in place and protect any hardware or windows on the garage door.

Step 4: Stir the Gel Stain Before applying the gel stain, thoroughly stir the can using a paint stir stick. This ensures an even distribution of color and consistency.

Step 5: Apply the Gel Stain Dip your brush or foam brush into the gel stain, allowing it to absorb the product. Start applying the stain to the garage door, working in small sections at a time. Apply the gel stain in long, even strokes, following the direction of the wood grain. Take care to avoid drips and excessive buildup.

Step 6: Wipe Off Excess Stain After applying the gel stain to a section, use a clean rag to immediately wipe off any excess stain. This step is crucial as it helps achieve an even and consistent color. Continue applying the gel stain and wiping off excess stain until the entire garage door is covered.

Step 7: Allow the Stain to Dry Once you have applied the gel stain and removed the excess, allow the garage door to dry according to the manufacturer’s instructions. Gel stains typically take longer to dry than liquid stains, so be patient and avoid touching the surface until it is completely dry.

Step 8: Evaluate the Color After the first coat of gel stain has dried, evaluate the color intensity. If you desire a deeper shade, you can apply additional coats, following the same application and drying process as before. Remember to wipe off excess stain after each application.

Step 9: Clean-Up Clean your brushes and other tools using paint thinner or mineral spirits, following the manufacturer’s instructions. Dispose of any used rags or materials in a safe manner, as some products can be flammable.

Conclusion: Gel staining your Garage Door Repair can be a rewarding and transformative DIY project. By following these step-by-step instructions, you can achieve a beautifully stained garage door that enhances the overall aesthetic of your home. Remember to take proper safety precautions and allow ample time for each coat to dry. With patience and attention to detail, your garage door will have a fresh and appealing look that lasts for years to come.

Bluegrass Garage Door

138 Portor St.
Mount Washington, KY 44047

1-502-203-7878

Powered by WordPress & Theme by Anders Norén