Local Businesses Blog in Texas

Cleveland Texas

Tag: garage door Page 1 of 39

How To Get Garage Door Open Without Power – MF Solutions

Losing power to your Garage Door Repair Niles IL can be inconvenient, especially if you need to access your garage urgently.

However, there are several methods you can use to manually open your garage door without power. In this guide, we’ll walk you through the steps to open a garage door without power safely and effectively, allowing you to regain access to your garage in no time.

1. Identify the Emergency Release Cord

Most garage door openers are equipped with an emergency release cord or lever that disengages the opener from the door mechanism, allowing you to operate the door manually. Locate the emergency release cord or lever, which is typically located near the top of the garage door opener unit or along the opener rail.

2. Pull the Emergency Release Cord

Once you’ve located the emergency release cord or lever, pull it down firmly to disengage the opener from the door mechanism. This action releases the tension on the drive system, allowing you to manually lift the garage door without power. You may need to use a step stool or ladder to reach the emergency release mechanism, depending on the height of your garage door opener.

3. Lift the Garage Door Manually

With the emergency release cord pulled, carefully lift the garage door manually using the handles or gripping points located on the sides of the door. Keep your feet clear of the door’s path and use your legs to lift the door rather than relying solely on your upper body strength. Depending on the weight of the door, you may need assistance from another person to lift it safely.

4. Secure the Door in the Open Position

Once the garage door is open, it’s essential to secure it in the open position to prevent it from closing unexpectedly. Place a sturdy object, such as a locking pliers or a clamp, on the track or the bottom of the door to hold it in place. This will provide added stability and prevent the door from closing accidentally while you work or enter and exit the garage.

5. Inspect the Door and Mechanism

With the garage door open, take the time to inspect the door and the mechanism carefully. Look for any signs of damage or wear, such as broken springs, loose cables, or misaligned tracks. Additionally, check the condition of the rollers, hinges, and other hardware to ensure they are functioning correctly. If you notice any issues that need to be addressed, contact a professional garage door technician for assistance.

6. Restore Power to the Garage Door Opener

Once you’ve completed your tasks in the garage and no longer need to operate the door manually, it’s time to restore power to the garage door opener. Locate the power cord or switch for the opener and plug it back in or flip the switch to the “on” position. This will re-engage the opener with the door mechanism, allowing you to operate the door automatically once again.

Conclusion:

Opening a garage door without power is a simple process that can be completed using the emergency release cord or lever on your garage door opener. By following the steps outlined in this guide and prioritizing safety throughout the process, you can safely and effectively open your garage door manually and regain access to your garage in the event of a power outage or other emergency.

MF Solutions

302 Cherrywood Rd Buffalo Grove, IL 60089

1-224-434-1780

How To Change A Genie Garage Door Opener Battery – Brothers Garage Door Service

Maintaining the functionality of your Garage Door Repair Livonia MI is essential for the smooth operation of your garage door. One crucial component of a Genie garage door opener is its battery, which powers the unit and allows it to function properly.

Over time, the battery may need to be replaced to ensure optimal performance. In this comprehensive guide, we’ll provide step-by-step instructions on how to change the battery in your Genie garage door opener, ensuring that your garage door continues to operate smoothly and reliably.

Understanding Genie Garage Door Opener Batteries

Genie garage door openers typically use a 12-volt battery to power their operation. These batteries are specifically designed to provide the necessary energy to operate the motor, control panel, and other components of the garage door opener. It’s essential to use a compatible replacement battery to ensure proper functionality and compatibility with your Genie opener.

Signs That Your Garage Door Opener Battery Needs Replacement

There are several indicators that your Genie garage door opener battery may need to be replaced:

  1. Weak or inconsistent performance: If your garage door opener struggles to open or close the door, or if it operates intermittently, it may be a sign that the battery is failing.
  2. Low battery indicator: Many Genie garage door openers are equipped with a low battery indicator light or audible alert, which will notify you when the battery needs to be replaced.
  3. Visible corrosion: If you notice any signs of corrosion on the battery terminals or inside the battery compartment, it’s a clear indication that the battery needs to be replaced.

If you observe any of these signs, it’s essential to replace the battery promptly to avoid any disruption to your garage door operation.

Changing the Battery in Your Genie Garage Door Opener

Follow these step-by-step instructions to change the battery in your Genie garage door opener:

  1. Locate the battery compartment: The battery compartment is typically located on the back or side of the garage door opener motor unit. Use a step ladder if necessary to access the compartment safely.
  2. Disconnect the power: Before removing the old battery, it’s essential to disconnect the power to the garage door opener to prevent any electrical accidents. Locate the power cord or switch and disconnect it from the power source.
  3. Remove the old battery: Carefully remove the old battery from the compartment, taking care to note its orientation. Most Genie garage door opener batteries are installed with the positive (+) and negative (-) terminals facing in a specific direction.
  4. Dispose of the old battery properly: Dispose of the old battery according to local regulations and guidelines. Many hardware stores and recycling centers accept used batteries for proper disposal.
  5. Install the new battery: Insert the new battery into the compartment, ensuring that it is oriented correctly with the positive and negative terminals aligned as indicated. Press the battery firmly into place to ensure a secure connection.
  6. Reconnect the power: Once the new battery is installed, reconnect the power to the garage door opener by plugging in the power cord or flipping the switch back to the “on” position.
  7. Test the garage door opener: Test the garage door opener to ensure that it operates smoothly and efficiently with the new battery installed. Use the remote control or wall-mounted keypad to open and close the garage door several times, checking for any issues or abnormalities in the operation.

Conclusion:

Changing the battery in your Genie garage door opener is a straightforward process that can help prolong the life of your opener and ensure reliable performance. By following the steps outlined in this guide, you can replace the battery safely and effectively, keeping your garage door operating smoothly for years to come.

Brothers Garage Door Service

29522 Wentworth St, Livonia, MI 48154, United States

1-734-292-0971

How To Change Code For Liftmaster Garage Door Opener – El Paso Garage Door Repair

Maintaining the security of your home is paramount, and one way to enhance security is by regularly changing the access code for your Garage Door Repair El Paso TX.

If you own a LiftMaster garage door opener and need to change the access code, you’ve come to the right place. Changing the code is a straightforward process that can be completed in just a few steps. In this comprehensive guide, we’ll walk you through each step of the process to ensure a successful code change and enhanced security for your garage.

1. Understand the Importance of Changing the Code

Before we dive into the steps for changing the code, let’s take a moment to understand why it’s essential:

  • Enhanced security: Changing the access code regularly helps prevent unauthorized entry into your garage and home.
  • Personalized security: By changing the code, you can create a unique combination that is easy for you to remember but difficult for others to guess.
  • Peace of mind: Knowing that your garage door opener’s access code is up-to-date provides peace of mind, especially when you’re away from home.

2. Locate the “Learn” Button

The first step in changing the access code for your LiftMaster garage door opener is to locate the “Learn” button:

  • The “Learn” button is typically located on the motor unit of the garage door opener.
  • It may be labeled as “Learn,” “Smart,” or “Program” and is usually near the antenna wire.

3. Choose a New Code

Before proceeding with the code change process, decide on a new access code:

  • Choose a combination that is easy for you to remember but difficult for others to guess.
  • Avoid using obvious combinations such as birthdates or sequential numbers.
  • Opt for a code that is at least four digits long for optimal security.

4. Put the Garage Door Opener into Programming Mode

Now, let’s put the garage door opener into programming mode:

  • Press and release the “Learn” button on the motor unit. You’ll notice that the indicator light next to the button will illuminate.
  • The garage door opener is now in programming mode and ready to learn the new access code.

5. Enter the New Code

With the garage door opener in programming mode, it’s time to enter the new access code:

  • Using the keypad on the wall control unit, enter the new access code that you’ve chosen.
  • Press the “Enter” button on the keypad to confirm the new code.

6. Test the New Code

Once you’ve entered the new code, it’s essential to test it to ensure that it has been programmed successfully:

  • Close the garage door using the existing code or remote control.
  • Wait for the garage door to close completely, then enter the new access code on the keypad.
  • Press the “Enter” button to confirm the code. If the code is accepted, the garage door should open.

7. Secure the Keypad

After successfully programming the new access code, it’s crucial to secure the keypad to prevent unauthorized access:

  • Ensure that the keypad is securely mounted to the wall and that there are no loose wires or connections.
  • If necessary, use a screwdriver to tighten any mounting screws or brackets.

8. Update Remote Controls

If you have remote controls for your LiftMaster garage door opener, it’s essential to update them with the new access code:

  • Press and hold the “Learn” button on the motor unit until the indicator light blinks.
  • Press the button on the remote control that you wish to program. The indicator light on the motor unit will flash to confirm that the remote control has been programmed successfully.

9. Test Remote Controls

After programming the remote controls, test them to ensure that they are working correctly with the new access code:

  • Stand at a reasonable distance from the garage door opener and press the button on the remote control.
  • The garage door should open or close in response to the remote control command.

10. Maintain Regular Code Changes

To maintain optimal security for your garage and home, consider changing the access code for your LiftMaster garage door opener regularly:

  • Set a schedule for changing the code, such as every few months or after any significant events, such as moving into a new home.
  • Keep a record of previous access codes and the dates they were changed for reference.

By following these steps and maintaining regular code changes, you can enhance the security of your LiftMaster garage door opener and enjoy peace of mind knowing that your home and belongings are protected.

El Paso Garage Door Repair

11501 Rojas Dr suite q, El Paso, TX 79936, United States

1-915-201-3339

How Much To Replace Garage Door Spring And Cable – El Paso Garage Door Repair

Garage Door Repair El Paso TX are essential components of your garage door system, responsible for counterbalancing the weight of the door and facilitating smooth opening and closing.

When a garage door spring or cable breaks, it can disrupt the functionality of the door, posing safety risks and requiring prompt replacement. In this guide, we’ll explore everything you need to know about the cost of replacing a garage door spring and cable, including factors affecting the cost, types of springs and cables available, and tips for selecting the right replacement.

Factors Affecting the Cost

Several factors can influence the cost of replacing a garage door spring and cable, including:

  1. Type of Spring: Garage doors typically use two types of springs: torsion springs and extension springs. Torsion springs are mounted above the door and wind up to store energy, while extension springs are located on either side of the door and stretch to provide tension. The type of spring used on your garage door will affect the cost of replacement.
  2. Size and Weight of the Door: The size and weight of your garage door will determine the size and strength of the springs required. Larger and heavier doors require stronger springs, which may be more expensive to replace.
  3. Type of Cable: Garage door cables are typically made from steel and come in various thicknesses and lengths. The type and size of the cable required for your door will affect the cost of replacement.
  4. Quality of Springs and Cables: The quality of the replacement springs and cables will affect the cost. Higher-quality springs and cables made from durable materials may have a higher upfront cost but can offer better performance and longevity.
  5. Labor Costs: In addition to the cost of the springs and cables themselves, you’ll also need to factor in labor costs for professional replacement. Hiring a professional garage door technician ensures that the replacement is done correctly and safely.

Cost Range of Replacing Garage Door Spring and Cable

The cost of replacing a garage door spring and cable can vary depending on factors such as the type of spring and cable, size of the door, materials used, and additional features. Here’s a breakdown of the cost range based on different scenarios:

  1. Torsion Spring Replacement:
    • Single Torsion Spring Replacement: $150 to $300
    • Dual Torsion Spring Replacement: $250 to $500
  2. Extension Spring Replacement:
    • Single Extension Spring Replacement: $100 to $200
    • Dual Extension Spring Replacement: $150 to $300
  3. Garage Door Cable Replacement:
    • Single Cable Replacement: $50 to $100
    • Pair of Cables Replacement: $100 to $200

Additional Costs and Considerations

In addition to the cost of the springs and cables themselves, you’ll also need to consider the following factors:

  1. Labor Costs: Professional installation typically costs between $100 and $200 for spring replacement and $50 to $100 for cable replacement, depending on the complexity of the job and the technician’s experience.
  2. Additional Parts: Depending on the condition of your garage door system, you may need to replace other parts such as rollers, hinges, or bearings during the replacement process. These additional parts can add to the overall cost but are essential for ensuring the proper functioning of the door.
  3. Emergency Service: If your garage door spring or cable breaks unexpectedly, you may need to pay extra for emergency service or after-hours replacement.
  4. Warranties and Guarantees: Be sure to inquire about warranties or guarantees on the springs, cables, and labor to ensure that you’re protected in case of any issues or defects.

DIY vs. Professional Replacement

While some homeowners may attempt to replace a garage door spring or cable themselves to save money, this is not recommended unless you have experience and expertise in garage door repair. Garage door springs are under high tension and can be dangerous to work with, posing a risk of serious injury or property damage if mishandled. Hiring a professional garage door technician ensures that the replacement is done safely and correctly, reducing the risk of accidents or injuries and ensuring the longevity of your garage door system.

Conclusion:

In conclusion, the cost of replacing a garage door spring and cable depends on factors such as the type of spring and cable, size of the door, materials used, labor costs, and additional parts. By understanding these factors and working with a reputable garage door technician, you can ensure that your garage door spring and cable are replaced correctly and safely, restoring the functionality and reliability of your garage door system.

El Paso Garage Door Repair

11394 James Watt Dr #603, El Paso, TX 79936, United States

1-915-201-3339

What Color Garage Door With Grey House – Garage Door Wizard

Garage Door Repair Cypress TX is a crucial decision that can significantly impact the overall appearance and curb appeal of your home. When your house is adorned in shades of grey, finding the perfect garage door color to complement its aesthetic can seem daunting. However, with careful consideration and some helpful guidance, you can choose a garage door color that enhances the beauty of your grey house while adding character and charm to your property.

In this comprehensive guide, we’ll explore various color options for garage doors that pair harmoniously with grey houses, helping you make an informed decision that elevates the look of your home.

1. Consider the Shade of Grey

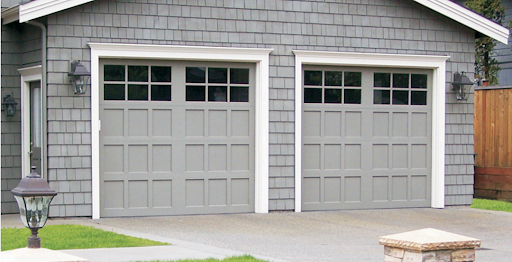
The first step in selecting a garage door color for your grey house is to consider the shade of grey used for the exterior. Grey comes in a wide range of tones, from light and airy to dark and dramatic. Take note of the undertones present in your grey siding, such as cool blue undertones or warm beige undertones, as these can influence the choice of garage door color. Matching the garage door color to the dominant undertone of the grey siding creates a cohesive and visually pleasing exterior palette.
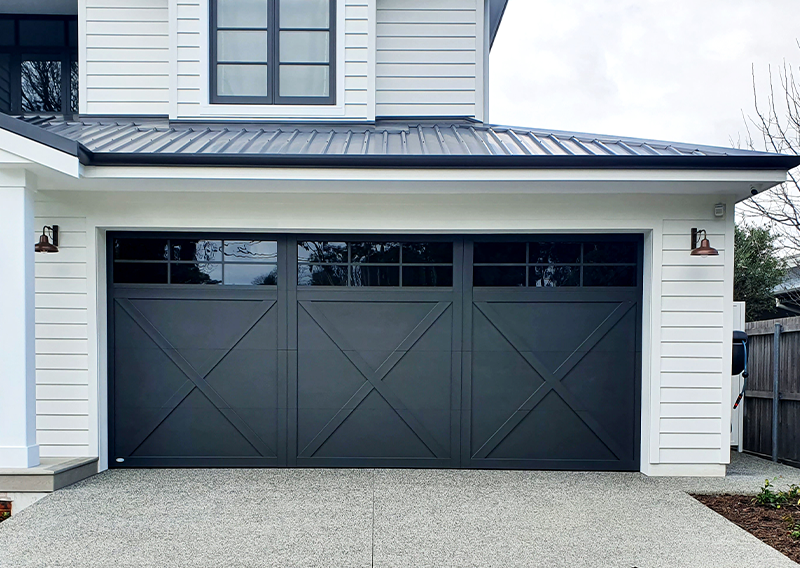
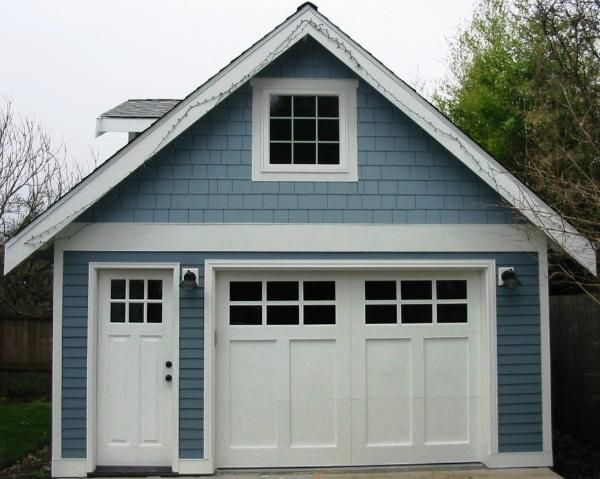
2. Embrace Contrast

While matching the garage door color to the grey siding is a popular choice, embracing contrast can create a striking and dynamic look for your home. Opting for a garage door color that contrasts with the grey exterior can add visual interest and dimension to the facade. Consider bold colors such as black, navy blue, forest green, or deep red to create a dramatic contrast against light grey siding. For dark grey houses, lighter shades such as white, beige, or soft grey can provide a refreshing contrast that highlights architectural details.

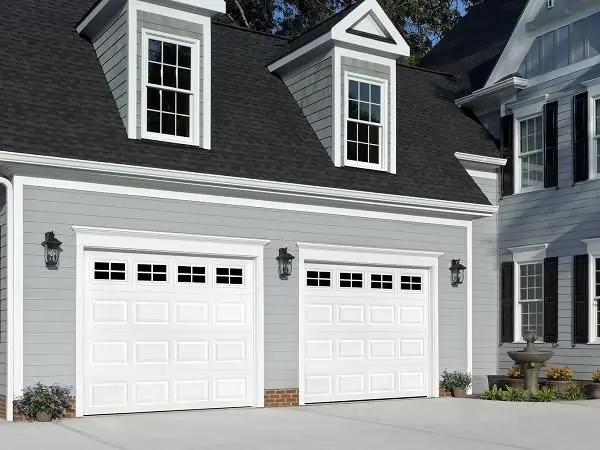
3. Explore Neutral Options

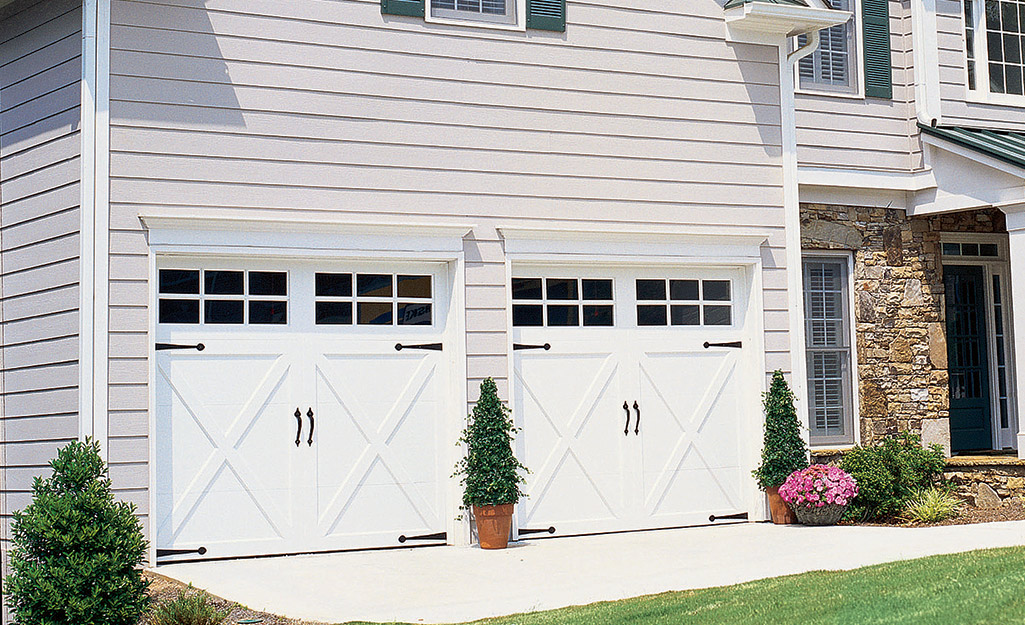
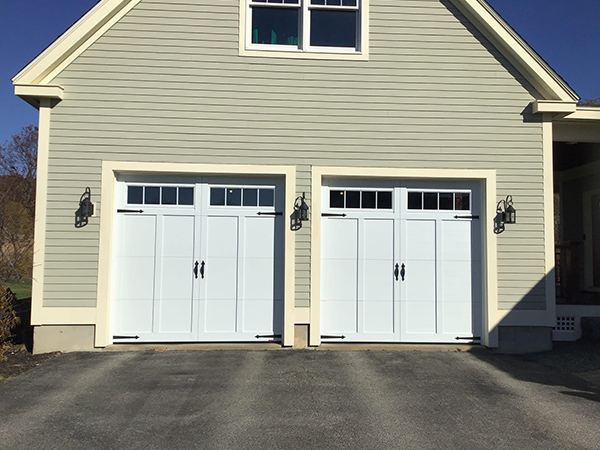
Neutral colors are timeless and versatile choices for garage doors that complement grey houses effortlessly. Shades of white, cream, beige, taupe, and brown offer a classic and sophisticated look that complements various shades of grey. Neutral garage door colors provide a clean and cohesive appearance while allowing other architectural features, such as trim and accents, to stand out. Consider selecting a neutral garage door color with subtle undertones that harmonize with the grey siding for a cohesive exterior palette.

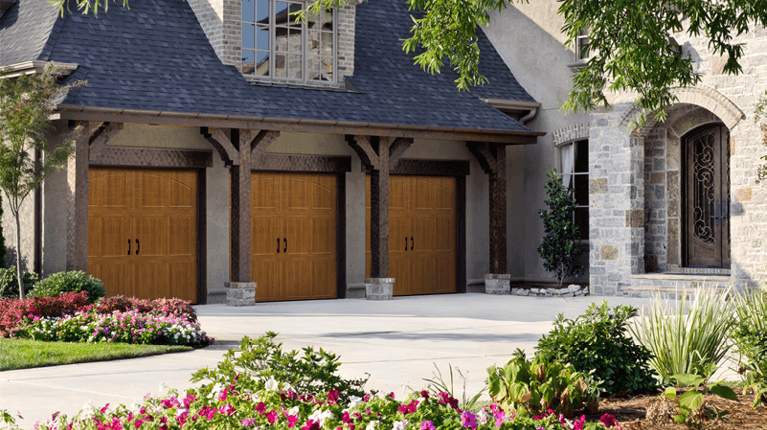
4. Incorporate Wood Tones

For a touch of warmth and texture, consider incorporating wood tones into your garage door design. Wood garage doors add natural beauty and character to grey houses, creating a warm and inviting aesthetic. Opt for wood garage doors crafted from authentic wood or wood-look materials that mimic the appearance of real wood without the maintenance requirements. Stained wood finishes in rich tones such as mahogany, cedar, or walnut complement grey exteriors beautifully and add a touch of rustic elegance to the facade.

5. Seek Inspiration

When choosing a garage door color for your grey house, it’s helpful to seek inspiration from various sources to visualize different color combinations and styles. Browse home improvement magazines, websites, and social media platforms for exterior design ideas and inspiration. Pay attention to homes with grey exteriors and take note of garage door colors that appeal to you. Additionally, consult with design professionals or color experts for personalized recommendations and guidance based on your specific preferences and architectural style.

6. Consider Architectural Features

Take into account the architectural style and features of your home when selecting a garage door color. Traditional homes with classic design elements may benefit from timeless colors such as white, black, or beige, while modern residences can explore contemporary hues such as charcoal grey, slate blue, or olive green. Consider the overall aesthetic of your home, including roofing materials, trim colors, and landscaping, to ensure that the garage door color harmonizes with the existing elements and enhances the overall curb appeal.

7. Test Samples

Before making a final decision on the garage door color, it’s essential to test samples in different lighting conditions to assess how they appear against the grey exterior. Obtain color swatches or sample panels from garage door manufacturers and place them next to the grey siding to evaluate how the colors interact with each other. Consider testing samples during different times of the day to observe how natural light affects the appearance of the colors. This process allows you to make an informed decision and ensures that the chosen garage door color complements the grey house beautifully.

8. Evaluate Maintenance Requirements

When selecting a garage door color, consider the maintenance requirements associated with each option. Lighter colors such as white or beige may show dirt and stains more prominently and require more frequent cleaning, especially in areas with high humidity or pollution. Darker colors such as black or navy blue may fade over time when exposed to direct sunlight and may require periodic repainting or touch-ups. Wood garage doors require regular maintenance, including staining or sealing, to preserve their appearance and protect them from the elements. Choose a garage door color that aligns with your maintenance preferences and lifestyle to ensure long-lasting beauty and performance.

9. Seek Professional Guidance

If you’re unsure about which garage door color to choose for your grey house, don’t hesitate to seek professional guidance from exterior design experts or garage door specialists. These professionals can provide valuable insights and recommendations based on their expertise and experience, helping you make a confident decision that enhances the curb appeal of your home. Schedule consultations or design appointments to discuss your preferences, explore different color options, and receive personalized advice tailored to your specific needs and style.

10. Visualize the Final Result

Before committing to a garage door color, take the time to visualize the final result and imagine how it will enhance the overall appearance of your grey house. Use digital visualization tools or create physical mock-ups using color swatches and samples to simulate different color combinations and assess their impact on the exterior. Consider how the garage door color integrates with other design elements, such as front doors, windows, and landscaping, to create a cohesive and harmonious look that reflects your personal taste and style.

By following these guidelines and considering various factors, you can choose the perfect garage door color for your grey house that complements its exterior, enhances its architectural features, and elevates its curb appeal. Whether you prefer subtle neutrals, bold contrasts, or natural textures, the right garage door color can make a significant difference in the overall aesthetic and value of your home.

Garage Door Wizard

17302 House & Hahl Rd Suit 208, Cypress, TX 77433, United States

1-832-373-7681

How To Open Garage Door Manually From Outside – CCM Overhead Doors

Being locked out of your Garage Door Repair Oklahoma City OK can be a frustrating experience. However, knowing how to manually open a garage door from outside can provide a solution to this problem and allow you to access your garage in emergency situations or during power outages.

In this guide, we’ll walk you through the step-by-step process of opening a garage door manually from outside, ensuring that you can regain access to your garage quickly and easily.

1. Locate the Emergency Release Kit

Most garage doors are equipped with an emergency release kit that allows you to disengage the door from the opener and manually operate it in the event of a power outage or malfunction. The emergency release kit typically consists of a release cord and handle, which are located near the top of the door, close to the center.

2. Identify the Emergency Release Cord

To manually open the garage door from outside, locate the emergency release cord and handle. The cord is usually red and hangs down from the track near the center of the garage door. It may be tucked away or obscured by other components, so take your time to locate it.

3. Pull the Emergency Release Cord

Once you’ve located the emergency release cord, pull it down firmly in the direction of the garage door. This action will disengage the door from the opener carriage, allowing you to manually lift the door without resistance from the motor.

4. Lift the Garage Door

With the emergency release cord pulled down, proceed to lift the garage door manually. Place your hands on the bottom edge of the door and lift it carefully, using your legs and back to support the weight. Be mindful of the door’s weight, especially if it’s a larger or heavier door.

5. Secure the Door in the Open Position

After manually opening the garage door, it’s essential to secure it in the fully open position to prevent it from closing unexpectedly. Use locking mechanisms or clamps to hold the door in place, ensuring safety and peace of mind until it’s time to close the door.

6. Exercise Caution

While manually operating the garage door from outside, it’s crucial to exercise caution and follow proper safety procedures. Avoid placing your fingers or hands near moving parts, such as hinges and rollers, to prevent injury. Additionally, be mindful of the door’s weight and take necessary precautions to avoid strain or accidents.

7. Perform Regular Maintenance

To ensure continued reliability and smooth operation of your garage door, perform regular maintenance and inspections. Keep the tracks clean and free of debris, lubricate moving parts as needed, and check the condition of springs, cables, and rollers regularly.

8. Consider Installing Backup Power

To prevent future inconvenience during power outages, consider installing a backup power source for your garage door opener. Backup power options, such as battery backup systems or generators, can provide peace of mind and ensure uninterrupted access to your garage, even when the power is out.

9. Seek Professional Assistance if Needed

If you encounter difficulties or safety concerns while manually opening your garage door from outside, or if you’re unsure about performing maintenance tasks, don’t hesitate to seek professional assistance. Contact a reputable garage door technician to inspect and repair any issues with your garage door system, ensuring safe and reliable operation in the future.

By following these steps and exercising proper caution, you can successfully open your garage door manually from outside and regain access to your garage when needed. Whether you’re facing a power outage, malfunctioning opener, or simply need to perform maintenance on your garage door system, knowing how to operate it manually provides invaluable peace of mind and convenience.

CCM Overhead Doors

1000 NW 80th St, Oklahoma City, OK 73114, United States

1-405-563-8982

How Can I Open My Garage Door Without Power – A 24 Hour Door Service

Garage Door Repair Madison MS can be inconvenient, especially when you need to access your garage urgently.

However, there are several methods you can use to manually open your garage door without power. In this comprehensive guide, we’ll explore emergency solutions and safety tips to help you open your garage door safely and efficiently during power outages or emergencies.

Understanding Garage Door Mechanisms

Before attempting to open your garage door manually, it’s essential to understand the basic mechanisms of your garage door system. Most garage doors operate on either a torsion spring or extension spring system, which counterbalances the weight of the door and facilitates smooth opening and closing. Additionally, garage doors are equipped with an emergency release mechanism, typically located near the motor unit, which allows you to disengage the door from the opener and operate it manually.

Emergency Solutions for Opening Your Garage Door Without Power

Follow these emergency solutions to open your garage door without power:

1. Locate the Emergency Release Cord:

Begin by locating the emergency release cord or lever on your garage door opener system. This cord is usually red and hangs from the motor unit or is attached to a release lever near the motor.

2. Pull the Emergency Release Cord:

Pull down on the emergency release cord to disengage the garage door from the opener. This action allows you to operate the door manually without power.

3. Lift the Garage Door:

With the emergency release cord pulled down, manually lift the garage door by grasping the handle or bottom edge of the door. Use caution and lift with steady, even pressure to avoid injury.

4. Secure the Door:

Once the garage door is open, prop it open securely using a sturdy object such as a broom handle or piece of lumber to prevent it from closing unexpectedly.

5. Close the Door Manually:

To close the garage door manually, lower it gently using the same steady, even pressure as when lifting. Avoid letting the door slam shut, as this can cause damage to the door and its components.

Safety Tips for Manual Garage Door Operation

When opening your garage door manually, it’s essential to prioritize safety to prevent accidents and injuries. Here are some safety tips to keep in mind:

1. Use Caution When Lifting:

When lifting or lowering the garage door manually, use caution to avoid straining yourself or causing injury. Lift with your legs, not your back, and ask for assistance if the door is heavy or difficult to maneuver.

2. Beware of Spring Tension:

Be aware of the tension in the garage door springs, especially if you have a torsion spring system. Avoid placing your hands or fingers near the springs, as they can snap under tension and cause serious injury.

3. Keep Children and Pets Away:

During manual operation of the garage door, keep children and pets away from the door and its moving parts to prevent accidents or injuries. Supervise children closely and educate them about the dangers of playing near the garage door.

4. Inspect the Door Regularly:

After manually operating the garage door, inspect it for any signs of damage or wear. Check the springs, tracks, rollers, and other components for signs of damage or malfunction, and address any issues promptly to ensure safe operation.

5. Restore Power Safely:

Once power is restored, re-engage the garage door opener by pulling the emergency release cord back into its original position. Test the opener to ensure that it functions properly and that the door operates smoothly.

Conclusion:

Knowing how to open your garage door without power is essential for maintaining access to your garage during emergencies or power outages. By following the emergency solutions and safety tips provided in this guide, you can safely and efficiently open your garage door manually and ensure the security and functionality of your garage door system. Prioritize safety at all times and address any issues or concerns promptly to maintain safe and reliable operation of your garage door.

A 24 Hour Door Service

417 Post Oak Cove, Madison, MS 39110, United States

1-601-664-8935

How To Fix Loose Chain On Garage Door Opener – Veterans Garage Door


A Garage Door Repair Sarasota FL can lead to noisy operation, erratic movement, and potentially unsafe conditions. The chain is an essential component of the garage door opener mechanism, responsible for lifting and lowering the door.

If you notice excessive slack in the chain or if it appears to be slipping off the sprocket, it’s crucial to address the issue promptly. In this guide, we’ll discuss how to identify and fix a loose chain on a garage door opener to ensure smooth and reliable operation.

Assess the Situation

Before attempting to fix a loose chain on your garage door opener, it’s essential to assess the extent of the problem and identify any underlying issues. Start by manually operating the garage door to observe the movement of the chain. Pay attention to any unusual sounds, excessive slack in the chain, or signs of wear and tear.

Tighten the Chain

The first step in fixing a loose chain is to tighten it to the proper tension. Most garage door openers are equipped with an adjustment mechanism that allows you to adjust the tension of the chain. Follow these steps to tighten the chain:

  1. Locate the tension adjustment screws or bolts on the garage door opener mechanism. These are typically located near the motor unit or on the rail assembly.
  2. Use a wrench or screwdriver to tighten the adjustment screws or bolts clockwise, gradually increasing the tension on the chain.
  3. Check the tension of the chain by lifting and lowering the garage door manually. The chain should have minimal slack, with no sagging or excessive movement.

Check for Wear and Damage

While tightening the chain may solve the immediate issue, it’s essential to inspect the chain for signs of wear and damage. Look for kinks, twists, or signs of stretching that indicate the chain may need to be replaced. Additionally, check the sprocket and other components of the garage door opener mechanism for wear or damage that may be contributing to the loose chain.

Lubricate the Chain

Proper lubrication is essential for maintaining the smooth operation of the garage door opener chain. Over time, dirt and debris can accumulate on the chain, causing it to become stiff and prone to binding. Lubricating the chain with a silicone-based lubricant can help reduce friction and prolong its lifespan. Follow these steps to lubricate the chain:

  1. Clean the chain with a rag or brush to remove any dirt and debris.
  2. Apply a small amount of silicone-based lubricant to the chain, focusing on the rollers and pins.
  3. Use a rag to wipe away any excess lubricant, ensuring that only a thin film remains on the chain.

Adjust the Limit Switches

In some cases, a loose chain may be caused by improper adjustment of the limit switches on the garage door opener. The limit switches control the travel of the garage door and ensure that it stops in the correct position. If the limit switches are misaligned or improperly set, it can cause the garage door opener to exert excessive force on the chain, leading to slack and wear. Follow the manufacturer’s instructions to adjust the limit switches properly.

Consider Professional Assistance

If you’ve tried the above troubleshooting steps and the chain on your garage door opener is still loose, it may be time to seek professional assistance. A qualified technician can inspect the garage door opener mechanism, identify any underlying issues, and perform necessary repairs or adjustments. Additionally, they can provide guidance on proper maintenance practices to prevent future issues with the chain.

Conclusion:

A loose chain on a garage door opener is a common issue that can affect the performance and safety of the door. By following the steps outlined in this guide, you can identify and fix a loose chain on your garage door opener, ensuring smooth and reliable operation. Remember to assess the situation, tighten the chain, check for wear and damage, lubricate the chain, and adjust the limit switches as needed. If you’re unable to resolve the issue on your own, don’t hesitate to seek professional assistance to ensure the safety and functionality of your garage door opener.

Veterans Garage Door

6497 Parkland Dr F, Sarasota, FL 34243, United States

1-941-699-6198

How Difficult Is It To Replace A Garage Door Opener – Roadrunner Garage Doors

Garage Door Repair Fort Worth TX is a task that many homeowners may need to undertake at some point. Whether your existing opener is malfunctioning, outdated, or you simply want to upgrade to a newer model with advanced features, replacing a garage door opener can improve the security, convenience, and functionality of your garage.

While it may seem intimidating at first, especially if you’re not particularly handy, with the right tools, preparation, and guidance, it’s a manageable project that you can complete in a day or weekend.

1. Assess Your Needs

Before diving into the process of replacing your garage door opener, take some time to assess your needs and preferences. Consider factors such as the size and weight of your garage door, the type of drive system you prefer (chain, belt, or screw), and any additional features you may want, such as Wi-Fi connectivity, battery backup, or smartphone control. This will help you narrow down your options and choose the best garage door opener for your specific requirements.

2. Gather Tools and Materials

Once you’ve determined your needs and selected a new garage door opener, gather all the necessary tools and materials for the installation process. This typically includes:

  • New garage door opener kit
  • Screwdriver
  • Adjustable wrench
  • Pliers
  • Level
  • Tape measure
  • Drill and bits
  • Stepladder
  • Safety glasses
  • Helper (optional but recommended for some steps)

Having all the tools and materials on hand before you begin will help streamline the installation process and prevent delays.

3. Prepare Your Garage

Before starting the installation, it’s essential to prepare your garage and workspace for the project. Clear out any clutter or obstacles around the garage door and ensure that there is enough space to work comfortably. If your garage has an automatic door opener already installed, disconnect it from the power source and remove any existing hardware or components that may interfere with the installation of the new opener.

4. Install the New Opener

The installation process for a new garage door opener will vary depending on the specific model and manufacturer, so be sure to follow the manufacturer’s instructions carefully. In general, the installation process involves the following steps:

  • Mounting the opener to the ceiling or wall of the garage
  • Installing the rail and trolley assembly
  • Attaching the motor unit and drive system
  • Connecting the opener to the garage door and electrical system
  • Testing the opener to ensure proper operation

5. Test and Adjust

Once the new garage door opener is installed, it’s important to test it thoroughly to ensure that it’s functioning correctly. Test the opener using both the remote control and the wall-mounted keypad (if applicable) to open and close the garage door multiple times. Pay attention to any unusual noises, vibrations, or movements, as these may indicate an issue that needs to be addressed. Additionally, check the safety features of the opener, such as the auto-reverse mechanism, to ensure that they are functioning properly.

6. Troubleshoot and Fine-Tune

If you encounter any issues during the installation process or testing phase, don’t panic. Many common problems can be easily resolved with some troubleshooting and fine-tuning. Refer to the manufacturer’s instructions for troubleshooting tips and solutions to common problems, or consult online resources and forums for additional guidance. If you’re still having trouble, don’t hesitate to reach out to the manufacturer’s customer support team or seek assistance from a professional garage door technician.

Conclusion:

Replacing a garage door opener may seem like a challenging task, but with the right tools, knowledge, and preparation, it’s a manageable DIY project that many homeowners can tackle successfully. By assessing your needs, gathering the necessary tools and materials, preparing your garage, following the manufacturer’s instructions carefully, testing the opener thoroughly, and troubleshooting any issues that arise, you can replace your garage door opener with confidence and enjoy the convenience, security, and functionality of a new opener for years to come. If you’re unsure about any aspect of the installation process or encounter difficulties along the way, don’t hesitate to seek assistance from a professional garage door technician to ensure that the job is done safely and correctly.

Roadrunner Garage Doors

8616 4th Street, Frisco TX 75034

1-214-504-1822

How To Install Electrical Outlet For Garage Door Opener – Wallen Garage Door Repair and Installation

Garage Door Repair Hampton Roads VA require a reliable source of power to operate efficiently.

While many garage door openers come with a standard plug that can be connected to a nearby outlet, installing a dedicated electrical outlet specifically for the garage door opener can eliminate the need for extension cords and provide a more secure connection.

Assessing Electrical Needs

Before you begin the installation process, it’s essential to assess your electrical needs:

Understanding Power Requirements

Check the specifications of your garage door opener to determine its power requirements. Most garage door openers operate on standard household voltage, typically 120 volts.

Identifying Circuit Capacity

Determine if your existing electrical circuit has the capacity to support an additional outlet. Avoid overloading the circuit by ensuring it has sufficient capacity to handle the additional load of the garage door opener.

Gathering Necessary Tools and Materials

Before you start the installation process, gather the following tools and materials:

  • Electrical box
  • Outlet
  • Romex cable
  • Wire nuts
  • Electrical tape
  • Screwdriver
  • Wire stripper
  • Voltage tester
  • Drill and drill bits

Having these tools and materials on hand will make the installation process smoother and more efficient.

Safety Precautions

Safety should always be your top priority when working with electricity. Before you begin the installation process, take the following safety precautions:

Turning Off Power

Turn off power to the circuit you’ll be working on at the main electrical panel. Use a voltage tester to verify that the power is off before proceeding with the installation.

Using Protective Gear

Wear protective gear, such as safety glasses and gloves, to protect yourself from electrical hazards and sharp edges.

Step-by-Step Installation Process

Now that you’ve completed the necessary preparations, it’s time to install the electrical outlet for your garage door opener. Follow these steps:

Choosing Location

Choose a suitable location for the electrical outlet near the garage door opener. Ensure it’s easily accessible and within reach of the garage door opener’s power cord.

Installing Electrical Box

Mount the electrical box to the wall or ceiling near the chosen location. Use screws to secure the box in place, ensuring it’s level and flush with the surface.

Wiring the Outlet

Run a length of Romex cable from the nearest existing electrical outlet to the newly installed electrical box. Strip the insulation from the ends of the wires and connect them to the terminals on the outlet, following the manufacturer’s instructions. Secure the wires with wire nuts and electrical tape to ensure a secure connection.

Testing and Verification

Once the outlet is wired and installed, turn the power back on at the main electrical panel. Test the outlet with a voltage tester to verify that it’s receiving power. Plug in the garage door opener and test its operation to ensure the outlet is functioning properly.

Conclusion:

Installing an electrical outlet for your garage door opener is a relatively simple and straightforward process that can provide convenience and accessibility. By following the steps outlined in this guide and taking appropriate safety precautions, you can enjoy the benefits of a dedicated electrical outlet for your garage door opener.

Wallen Garage Door Repair and Installation

732 Bluecrab Rd Ste D, Newport News, VA 23606, United States

1-757-256-4543

Page 1 of 39

Powered by WordPress & Theme by Anders Norén